Wednesday, December 29, 2010

Thanks For Caring


This is a card I did yesterday with the new stamp set, Thanks for Caring. When I got it done it still needed something so I added the velum butterfly that I just ran through my big shot and added some self sticky jewels. The Butterflies are stamped in Stazon ink and then colored with Blender pen.
Stamps: Thanks for Caring
Ink/Paper: Rich Razzleberry, Certainly Celery, Marina Mist, Whisper White, Basic Black, Stazon Jet Black
Punches: 1 3/4 Circle Punch, 2 1/2 Circle Punch, Beautiful Wings Imbosslit
Glitter

Tuesday, December 28, 2010

Birthday Wishes


Here is another card done with a new Sale-A-Bration set that will be available Jan. 25th. I never have any guy birthday cards so I tried to leave the pink and purple off this one.
Stamps: So Happy For You (Sala-A-Bration) Bring on the Cake (Occasions Mini Catalog)
Ink/Paper: Marina Mist, Peach Parfait, Basic Black, Whisper White, Real Red
Punches: 2 1/2" circle punch, Scallop Trim Border

Monday, December 27, 2010

Fun Flowers and Punch Bunch


Ok now that Christmas is over it is time to get back in my craft room. Which by the way thanks to my WONDERFUL husband is now equipped with a new computer monitor and t.v/dvd. I love it!
This is the new die cut from the Stampin' Up! Occasions Mini catalog called Fun Flowers. I also used the Sale-A-Bration set called Punch Bunch. I love using die cuts and punches, it makes things SO fast! I am hoping to get some more cards done this week so check back later this week!
Stamps: Punch Bunch
Die Cut: Fun Flowers (#121812 $32.95)
Punches: Scallop Circle, Circle Punches, Bird Punch (leaves on the flower)
Paper/Ink: Daffodil Delights, Rich Razzleberry, Mellon Mambo, Old Olive

Saturday, December 18, 2010

Mmmm.. More Chocolate Cards

Here is my second card with the "Eat Chocolate" set from the new Stampin' Up Occasions Mini catalog.

Stamp Sets: Eat Chocolate, I (Heart) Hearts
Ink/Paper: Melon Mambo, Early Espresso, Daffodil Delight, Whisper White, Pink Pirouette
Punches: Heart Punch, Word Window

Friday, December 17, 2010

Eat Chocolate

I finally got all my presents wrapped and now I can get back to stamping!

This card was done with the new set "Eat Chocolate" that will be available in the Occasions Mini Catalog starting on January 4th. I am such a big chocolate lover I knew this set had to be mine! It also has the "Build a Cupcake" punch on it. This punch is a lot of fun to use and gives you a lot of different options.
Stamps: Eat Chocolate
Paper: Wicked Fun DSP, Basic Black, Whisper White, Daffodil Delight, Rich Razzleberry,
Punches: Decorative Label, Build a Cupcake, 2 1/2 circle, 1 3/4 circle

Thursday, October 28, 2010

Bookmarks

I have been looking at this Halloween paper for awhile and wondering what I wanted to do with it. Then I got the idea to make these bookmarks for my daughters "Specials" teachers. That would be, PE, Music, Art, and Library. These are teachers that sometimes get over looked on the holidays because they have so many kids during the day. I just tied them on to a full sized chocolate bar and put a cute little tag on the back. Happy Halloween to them!

Monday, October 18, 2010

Starbucks Tin


I buy the Starbucks Mocha Powder to make my own mocha at home with my espresso maker. It comes in this black tin with the Starbucks logo on it. I rinsed it out and covered it with some paper and added the words and snowflake. I think I will fill it up with some chocolate for some lucky person for Christmas.
Paper: Holly Jolly Christams
Stamps: Tags Til Christams
Big Shot: Snowfake #2 Die

Saturday, October 9, 2010

Pink and Green???


Ok so I was getting tired of red and green and tried out some pink and green. I was not sure I really liked it at first, but it is kind of growing on me. I think this is what happens with you are up past your bed time stamping with a glass of wine :)
Stamps: Holiday Happiness
Ink/Paper: Always Artichoke, River Rock, Very Vanilla, Rose Red, Pretty in Pink

Thursday, October 7, 2010

More Trees...

Here is another version of the Christmas tree.

Christmas Tree

I am still trying to get ready for my Holiday Stamp camp. I have such a hard time picking out cards. I swear I see them in my sleep. Here is one more option with the set "Holiday Happiness". I think this is my favorite one so far. I still have a week so who knows how many more times I will change my mind!

Stamps: Holiday Happiness, Punch Pals
Ink/Paper: Riding Hood Red, Old Olive, Vanilla, Jolly Holiday DS

Monday, October 4, 2010

Punch Pals

Happy Monday! I spent most of Sunday starting to get ready for my Holiday Stamp Camp. This is one of the cards I think we will be doing. I had to dig out my Punch Pals set to pair with my new snowflake die cut. This set was getting a little dusty on shelf so it was fun to use it again.

Stamps: Punch Pals
Ink/Paper: Not Quite Navy, Baja Breeze, Whisper White, Candy Cane Christmas Desinger Paper

Tuesday, September 28, 2010

Magnetic Photo Frame


This is a magnetic photo frame I made to send out to a few family members for Christmas. Of course I have not gotten Christmas pictures taken yet so I had to pull this picture out from a few years ago just to show you what it will look like. This is a pretty fast and easy project to make.
Just cut a magnetic sheet the width of the Top Note die and then cut a piece of designer paper the same size. Remove the back of the magnetic sheet and stick on the DP. No glue needed! Send the whole thing through the Big Shot using the Top Note die. Embelish and stick it up on the fridge with your Christmas photo.

Tuesday, September 21, 2010

Joy Card

Phew.... I am back! I had Stamp Clubs last week and got super busy and did not get around to stamping. I don't know if you know the phrase "I am so far behind I am in first place" but that was me last week! I am still playing catch up this week.
Anyway here is a new card! Yeah!!!!

Stamp Sets: Welcome Christmas, Jolly Old Saint Nick, Fabulous Phrases
Ink/Paper: Pear Pizzazz, Poppy Parade, Whisper White, Basic Black
Punches: 3/4", 1", 1 3/8, 1 1/4 Circle Punches

Monday, September 13, 2010

Gift Cards


Here is a gift card I did for a retirement present last spring. I think these colors work well together.
Stamps: Vintage Vogue, Teeny Tiny Wishes
Ink/Paper: Pretty In Pink, Soft Suede, Melon Mambo

Sunday, September 12, 2010

Simple Halloween


Here is a pretty quick Halloween Card. I used some scraps of paper I had that I didn't want to put away and came up with this card.
Stamp Set: Wicked Cool
Ink/Paper: Wicked Fun DSP, Basic Black, Cajun Craze, Old Olive

Thursday, September 9, 2010

Soft Suede Christmas


This is my first card done with the background stamp Christmas Collage. Since it is such a big stamp it is really easy to use. On this card I cut three pieces of vanilla paper. I then stamped the image on each piece and trimmed two of the pieces down to "nestle" on top of the previous. Don't worry I didn't do any math I just eyeballed and went for it.

Stamps: Christmas Collage (Holiday Mini), Tags Til Christmas
Paper/Ink: Soft Suede, Very Vanilla
Punches: Ornament Punch
Ribbon: Trim Tinsel

Wednesday, September 8, 2010

Oh Christmas Tree...

Phew... finally got around to some stamping last night. I stayed up past my bed time, I am such a wimp, but it was nice to have the time.

This card is done with the Holiday Happiness set out of the Stampin' Up Idea Book and Catalog). It uses the new Jolly Holiday designer paper and the new In Color Pear Pizzazz.

It's kind of a crazy layout but I think it works. If you need any supplies to start your Christmas cards please visit my Stampin' Up! web site, www.amyklemo.stampinup.net

Stamps: Holiday Happiness
Ink/Paper: Old Olive, Pear Pizzazz, Cherry Cobbler, Very Vanilla, "Jolly Holiday" DS Paper
Ribbon: Pear Pizzazz
Punches: 3/4 inch circle punch, scallop edge

Tuesday, September 7, 2010

Criss Cross Box


Ok... I am busted AGAIN! This is a another project from last year. We had company this weekend and I just did not get any stamp time. I hope tomorrow will be better.

Thursday, September 2, 2010

Christmas Greetings


I am getting my post up early today because today is the kick off of college football! Hmmm...stamping and football??? I know it is a strange combo but I do love to watch college football. My team the University of Idaho is playing tonight and I will be on my couch cheering them on!
So speaking of different combos...this is the same card done in different color schemes. One is done in the traditional Christmas colors and the other a little bit different. I am all about red for Christmas but something is pulling me towards the blue and suede card.
Stamps: Welcome Christmas (Idea Book and Catalog), Grateful Greetings (Idea Book and Catalog)
Ink/Paper: Cherry Cobbler, Very Vanilla, Old Olive and Baja Breeze, Soft Suede, Very Vanilla
Punches: Large Scallop, Circle Punch, Scallop Edge Border Punch

Wednesday, September 1, 2010

Christmas Bag


No stamping time again today :) I had to pull this out of last year's stash. This is a little box that holds a bag on the inside. I used the oval punch to punch a hole in the bag and tie it inside the box. These reindeer crack me up. The first time I saw this set I knew I had to have it!


Stamps: Holiday Line Up, Teeny Tiny Wishes
Paper/Ink: Chocolate Chip, Real Red, Whisper White
Punches: Large and Small Oval, Word Window, Scallop Edge, Snowflake

Tuesday, August 31, 2010

Welcome Christmas


Here is another Christmas card! This is done with the set "Welcome Christmas" out of the big catalog.
Stamps: Welcome Christmas (Big Catalog), Seasonal Sentiments (Mini Catalog)
Paper/Ink: Wild Wasabi, Riding Hood Red, Baja Breeze, Whisper White, Candy Cane Christmas Designer Paper
Punches: Snowflake Punch

Monday, August 30, 2010

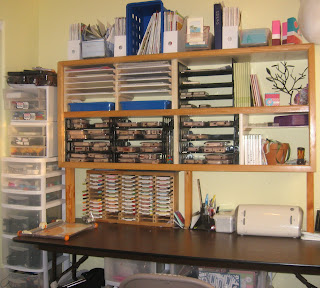
Stamp Space


I thought I would post some pictures of my stamp space today. I switched rooms last year and have been having a hard time trying to fit in the 10 foot by 10 foot space. I think I have it mostly worked out now I just need to take the time to clean it once in while so I can use it :)


The bookshelf is one I picked up at a yard sale. I just put extra plugs in all the holes and cut out foam board to use as shelves going down the entire length. I have a folder on top of each slot that is for scraps and the whole pieces under it. This works great for me because I have no patience for filing anything!


The other shelf is one my mother in law saved from an office remodel. My husband added the shelves and it works great. Everything is right in reach. This is where I store my 12 X 12 paper, stamps, catalogs, and a lot of other things. The stamp pad holder my father-in-law made for my birthday a couple of years ago. Having the markers stored by the stamp pad is such a time saver!!!


Sunday, August 29, 2010

Autumn Days

Sorry, I was out of town this weekend so I have to post a card from last year. This is from the set "Autumn Days" that was new to the catalog last year. To get the color variation on the bird just color directly on the bird stamp with the markers. The wheat was stamped and then stamped again without rinking to get the lighter and darker colors.
Tomorrow school starts so hopefully I will get a chance to get some stamping done while my littlest one takes a nap and my big girl is at first grade!

Thursday, August 26, 2010

Love the Owl Punch

I just can't stop using the new Owl Punch!

Stamps: Smarty Pants, Teeny Tiny Wishes
Ink/Paper: Basic Black, Pumpkin Pie, Basic Gray Whisper White
Big Shot: Polka Dot Embossing Folder
Punch: Old Punch

Wednesday, August 25, 2010

Holiday Happiness

OK so what do you think of Purple, Red, Green, and Yellow together for a Christmas card?
This card is made with a new set from the Idea Book and Catalog called Holiday Happiness. I bought this set in clear which made it really nice to get those ornaments hung on the tree. No floating ornaments...yeah!!! The big ornaments came from the "Delightful Decorations" set.
With the matching ornament punch this card went together quickly!
Stamps: Holiday Happiness, Delightful Decorations
Paper/Ink: Perfect Plum, Wild Wasabi, Riding hood Red, Daffodil Delight, Whisper White
Punches: 3/4 Circle Punch, Ornament Punch

Tuesday, August 24, 2010

More Santa Cards


Here is another card with the "Jolly Old Saint Nick" set from the Holiday Mini. So far I have really only played with the Santa image but I am going to have to move on to the snowman soon. I think he is really cute.
Stamps: Jolly Old Saint Nick
Paper/Ink: Early Espresso, Cherry Cobbler, Very Vanilla
Punches: Scallop Oval
Big Shot: Polka Dot embossing folder
Ribbon: 1/8 Taffeta Ribbon


Monday, August 23, 2010

1st Day of School

This is going to my daughter's new teacher on her first day of school. The pencils are already sharpened and put in a floral foam to hold them in place. The Owls are done with the new Owl Punch in the Stampin' Up Idea and Catalog. The vase came from the dollar store. I think the whole project cost me under $3.00.

I used to teach 1st grade and I know how valuable sharpened pencils can be. Do you know how long it takes 6 year old to sharpen a pencil!!!

Sunday, August 22, 2010

Time to Start!


Christmas camps always creep up on me so fast I am starting early this year. Here is my first card done with the Stampin' Up set "Jolly Old Saint Nick". This is a set out of the new Mini Catalog that is available Sept. 1st.
Supplies:
Stamp Set: Jolly Old Saint Nick
Colors: Baja Breeze, Riding Hood Red, Basic Black, Whisper White
Punches: Scallop Oval, Decorative Label Extra Large Punch (Holiday Mini), Snowflake
Designer Paper: Candy Lane Christmas (Holiday Mini)


Thursday, August 19, 2010

Do You Count Your Trick Or Treaters?


This is a board to count the Trick Or Treaters we have on Halloween. My grandpa used to keep track how many he had and would call my dad to see how many he had throughout the night on Halloween. Now that I have a family it is tradition to count the trick or treaters and call my dad and compare.
This board is made out of a 12 x 12 piece of tin that I got at Craft Warehouse. I then glued it the paper on it. I used the paper from Stampin' Up! called "Wicked Fun". This was so easy because this paper is already designed with the raised bats on it. I did nothing! Then I punched holes using my Crop-A-Dile that went right through the tin and paper.
Holding on the notebook paper to keep track on the trick or treaters is the magnet I posted last week.
On the back of the board I am going to write our address, year, and how many trick or treaters we had each year before I put it away. I think it will be a fun thing to pass down to my kids some day. I just love traditions and holidays!

Wednesday, August 18, 2010

Tree Card


I have been using a lot of my new stamp sets but here is a card done with two of my favorite old sets. This uses "Season For Friendship" and "Trendy Trees".

Tuesday, August 17, 2010

Morning Cup


This card is done with the new Stampin' Up! set "Morning Cup". I have been waiting for them to come out with a new coffee set and here it is!
I can't wait to have some more time to play with this set!

Monday, August 16, 2010

Candy Tin


I made this Halloween Candy Tin out of a tin I picked up at Target for $1.00.
I filled it with a floral foam and then covered it with paper that I crimped and then put through my shredder. Then I glued the candy on Popsicle sticks and arranged them in the tin.
The Stampin' Up! supplies I used were...
Owl Punch
Large Scallop Punch
Circle Punches
Wicked Fun Designer Paper
1 1/4 Stripped Grosgrain Ribbon
Old Olive, Pumpkin Pie, Elegant Eggplant Markers
Stamp Sets...
Batty For You
Gratefull Greetings

Sunday, August 15, 2010

My Digital Studio


Here is another page made with My Digital Studio. This is such an easy way to scrapbook! These are pictures of my son picking huckleberries while we were camping last year. He LOVES huckleberries!

Wednesday, August 11, 2010

Glitter Spider Web


This is another card using the Spider Web embossing folder. I embossed two of these and then cut them down to make them smaller. Then I sprayed them with Smooch Spritz. It is hard to tell from the picture but the webs looks almost like sparkly leather. Then It is layered on the Haunted Hill jumbo wheel image and colored with Stampin' Up Markers, and blender pens.
Basic Black
Cajun Craze
Old Olive

Tuesday, August 10, 2010

Spider Web Embossing


I just got my new Spider Web Embossing Folder. It is so fun to use, and is going to be great for Halloween cards.
This card is Old Olive, Razzleberry, and Black. It also uses the new Stampin' Up Halloween Designer paper.

Monday, August 9, 2010

More "Elements of Style"


Here is another card done with the stamp set "Elements of Style". This one was done with More Mustard, Always Artichoke, and the new color Cajun Craze.
My new Stamp order comes tomorrow with my new Christmas sets and the rest of my Halloween goodies. I can't wait!

Sunday, August 8, 2010

New Set, "Element of Style"


This a set called "Elements of Style" from the Spring Mini that I just got. When it made the big catalog I couldn't wait any longer. It is done in Crumb Cake (what used to be Kraft), Vanilla, and Espresso.

Saturday, August 7, 2010

New Owl Punch

This is my first card with the new Owl Punch. This is also my first Halloween card this year. I always think I am starting early and then before I know it Halloween is here and I am way behind! So Boo... or in this case I guess it is Yeah!!! One Halloween card done for me!

Tuesday, August 3, 2010

Halloween Magnet


Here is a quick fridge magnet for Halloween. This uses the new magnet sheets that are in the new Stampin' Up catalog. You send it through the big shot with the top note di and you get a top note shaped magnet. Then you just decorate it and the magnet sheet is self sticky so you peel off the backing and stick it on. I love these magnet sheets. Really easy to use and really sticky. These could hold up pretty heavy things on the fridge (like my 1st graders art projects that use a LOT of glue).

Thursday, July 8, 2010

MDS

I am so far behind with scrapbooking I am pulling stuff up from a couple of years ago. Here is a page I did on My Digital Studio. It was so fast to put together!

Wednesday, July 7, 2010

My Digital Studio...


Here is a scrapbook page I made with My Digital Studio from Stampin' Up. My son was supposed to be getting in the bath but instead I found him playing in his construction hat in his room. I couldn't resist getting out the camera!

Tuesday, July 6, 2010

More Baby Tees...

Here is another card done with the new "Baby Tees" wheel. This one uses the same colors with a different lay out. The background is done with an embossing folder in the Big Shot.

Thursday, July 1, 2010

Baby Tees Wheel

Here is a card using the new wheel from Stampin' Up called, "Baby Tees". It also uses the new colors Marina Mist, Daffodil Delight, and Early Espresso.